Tuesday, July 31, 2012

RIT dye

Dear Monica,

I have this great hat that I have had for about ten years.  I love everything about it except the color.  It just doesn't match anything.


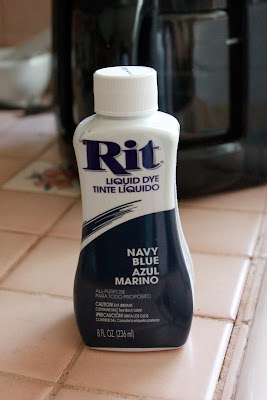
So, I thought I would dye it.  I bought some navy blue RIT dye.


I put 3 gallons of hot water, the bottle of dye, and a cup of salt into a large bucket.  Put the hat in and made sure it was completely covered with the water.


I left it in the dye for an hour, making sure to stir it so the dye would be even. After the hour was up I poured the dye down the sink and rinsed the hat with cold water until the water ran clear.  


Do you want to see the finished hat?

Yep!  Complete and total failure!!  The hat is a cotton/polyester blend so it should have retained at least some dye. I did successfully dye my hand and the paint stick.


XOXO
Emily


Thursday, July 26, 2012

Watermelon Pants Set

Dear Emily,

I finally had a chance to take pics of Caroline in the outfit I finished for her this week.

I have had the pattern for awhile, as well as the fabric. I have a fabulous quilt shop nearby, Tomorrow's Treasures with a great section of heirloom sewing supplies and fabric.

I used this pattern (view A)...

I have had the material and the pattern for about a year, I am embarrassed to say. Too many things on my "to sew" pile! The pattern was pretty easy, especially the pants. The seams in the pants were sewn with French seams so there is a nice tailored look. On the inside. Where no one can see.

I made the piping for the top with the same material I used for the pants. I could not find buttons for the top in the right shade of pink so I bought a covered button kit and made covered buttons from the same material I used for the pants and piping.


They were not hard to make but the thingamajig that you put the button in to hold it while you press the shank on doesn't work so well. If I wasn't careful, the parts would slip and go together crooked. I did use the "tools" that came with the kit to get the pieces set together but had to take the assembled button out of the white part to get in pressed together tightly.

The color looks funny on here, more of an orange than pink. Honest, it really is pink.


I love the side buttons. The bottom button is almost at her waist so the rest of the left side is open. I would definitely use this pattern again but for a fall/winter outfit, making the pants long and adding long sleeves to the top.


Another outfit Natalie gets one day!

XOXO

Monica

Monday, July 23, 2012

Beauty Balm/BB Cream

Dear Emily,

I haven't shown Caroline a picture of Natalie's circle skirt yet. She is going to want one as soon as she sees Nat's.

Have you heard of the latest thing in makeup? Our mother was the one who told me about it. She is pretty hip, you know. Anyway, the latest thing is bb cream, the "bb" standing for "beauty balm." it is an all-in-one primer, moisturizer, sunscreen, among other things, depending on the brand. Mom and I tested several in Ulta...Smashbox, Garnier, Stila, Too Faced, and Boscia. The Boscia was my favorite but a little out of my price range at $38. I ended up buying the one by Garnier, "Skin Renew".


I do like it. I wear it on days I need some coverage but want something quick. (I have been using Bare Minerals lately. I really like it but it is not quick.) The other day, I came across a coupon for Maybelline's version, Dream Fresh."


A dollar off so I had to try it. I like it as much as the other but the main difference is Maybelline's has an SPF of 30 and Garnier's is 15.

So, there you have my beauty tip for the week.

Hope you are finding some time to sew! I have a couple projects to share with you soon. And I just remembered I have to make slips for the girls to wear under some beautiful antique dresses our Aunt Judi sent. Send me Natalie's measurements when you get a chance! (chest, waist, and nape of neck to just below the knee)

Xoxo

Monica

PS I just did this whole post using the Blogsy app on my iPad. It has taken me awhile to find my way around the app but I think I have finally figured most everything out.


Friday, July 20, 2012

Ruffle Circle Skirt

Dear Monica,

I love ruffle fabric and when I saw this tutorial by Katy from No Big Dill on Simple Simon and Company's Skirting the Issue, I knew I had to make one for Natalie.  I had a bit of left over raspberry ruffle fabric and whipped this up for Natalie.


It was super easy.  I just cut the fabric in a circle following Katy's tutorial, added elastic for the waist, and trimmed the ruffles at the hem.  It is very light and twirly and super cute.  


Now I want one!  Do you think it would look good on me?

XOXO
Emily


Thursday, July 19, 2012

Homemade Laundry Detergent

Dear Emily,

I know you have been waiting since yesterday to see what I made with all this.


Ta da! Laundry detergent.

Am I nuts or what??

Paul came in when I was mixing it all together and asked if it was really cheaper. I haven't done the math and I am not sure how to but everywhere I read about it said it is cheaper. Yes, I do know how to add the cost of each ingredient but what to divide it by? I have no idea how many washes I will get, short of measuring it all and that would take FOREVER.


I said I was using a recipe that has been all over blogs and Pinterest lately. I first saw it posted on Kim's blog, Savvy Southern Style. Her husband thought she was crazy when he caught her grating bars of Fels-Naptha into a dirty old bucket. It looked like grated cheese. Since I have better things to do with my time than grate bars of soap, by hand, I used my food processor. (Gosh. I hope all the toxic stuff comes out and I haven't ruined my Cuisinart!)


Not cheese but this:


Back to the recipe...Kim had gotten her recipe from Stone Gable's blog. Whew! Sometimes I feel like Alice following a rabbit into a hole when I look for the original source of something on a blog. I followed the instructions exactly except I used Purex Crystals (cheaper) instead of Downy Un Stopables prettier). I mixed it all in a heavy duty garbage bag and was glad I did. All those powders are heavy. I got almost all of it into an empty Utz Cheeseball container. (Ask Gabe what happened to them. I am never going to buy them again, at least not in that quantity and then only on special occasions though I am not sure what special occasion calls for cheeseballs. I had to argue with a two year old that he couldn't have them for breakfast every day until they were gone.) What didn't fit into the container, I put in jars for you and a couple other lucky people who get to test the detergent out. Aren't all ya'll lucky?

I did one wash with it so far, some not so white whites and one of Caroline's bunnies. I have yet to see the results but did take the bunny out of the dryer early for Caroline. She complained about the smell. I think it smells way better than before it was washed. I pointed that out and reminded her that she helped pick out the Purex Crystals scent that is making the bunny "smell." Apparently she likes it to smell like, never mind. I don't know what you call that smell. I saved the scoop from the Oxyclean to use to measure and will be figuring out the amount to use in the next few loads. I have seen many comments other places about how much to use. I used about 2 tablespoons. Not sure if that was enough.

I'll give you your jar of it when I see you in August and you will have to let me know what you think. And if it makes everyone itch. (That is what I am worried about. What will I do with a huge cheeseball container of laundry detergent?)

Love,
Monica


Wednesday, July 18, 2012

Guess what I am making...

Dear Emily,

I spent some time today at the sewing machine making pants for the boys that will match the seersucker skirt you made Caroline. (Not the strawberry one) Not that I was necessarily going for the matchy-matchy thing but they will make for a good beach photo. It had been awhile since I had sewed. So long, as a matter of fact, that I put the bobbin in backwards twice. I noticed something was wrong with the tension so I adjusted the bobbin. The tension was still off so I checked the bobbin again and realized it was in backwards. Apparently I need to not let so much time go by between sewing sessions!

And speaking of sewing, I have another project ready for tomorrow. Not a sewing project, actually. While I do have a couple of things I would like to finish by Friday of this week, I have a little non-sewing side  project planned. It involves the items in the photo below but I will leave it at that. Can you guess what I am going to make? I have seen the recipe for "it" all over blogs and Pinterest lately so I thought I would jump on the bandwagon, too. I'll let you know how it turns out after I do some laundry. (I think for the first time in my life I am actually looking forward to doing laundry!)


Love,
Monica

ps. I edited the photo on PicMonkey, a photo editing website similar to Picnik. Fun effects and graphics that are super-easy to use.

Tuesday, July 17, 2012

Washers as Pattern Weights

Dear Emily,

I absolutely LOVE your key chain. I am going to steal the idea for Paul's birthday in a couple of months. (Shhh. Don't tell!) I looked on Amazon for on and found several right away. You are right, they are way cheaper. This one was $12.70 and there were a couple even cheaper. I like the wooden box these are in and shipping is free with my Amazon Prime.

Amazon

This is what I do with washers:


Pattern weights. I stopped using my old folding cardboard cutting board quite awhile ago and use my cutting mat instead. Remember those cardboard cutting boards? Just in case you don't, let me refresh your memory:
Amazon


It really must be a dinosaur. That is the only image I could find on the 'net. I just can't seem to part with mine. What if I need it for something? In the meantime, it resides in the coat closet under the stairs and the kids get it out occasionally to use for a fort.


Maybe that is why I can't part with it? Instead this is what I use for a cutting surface:


www.olfaproducts.com

Where was I? Oh, yeah. Pattern weights. With the old cardboard cutting board I just stuck pins in the pattern piece to hold it to the fabric. Can't do that with a cutting mat. Enter the washers. I got the heaviest ones and they are about two inches in diameter. I have seen some wrapped in ribbon but I left mine plain. I think I may decoupage mine one day when I have nothing else to do (ha!) like the necklaces in this tutorial.


Little Birdie Secrets
  
Love,
Monica


Monday, July 16, 2012

Stamped Washer Keychain

Dear Monica,

I had been planning this project for Father's Day but then we all got sick with some horrible virus and I didn't get it done.  So this week, I made it for Sam's birthday....a key chain with all the kids' names stamped on it.


I bought washers in a variety of sizes at Lowes.  I bought more than I needed because I had read that I would waste a few practicing. 


 I used my Making Memories punch set, that I bought at Michael's a while ago to stamp on clay.  I think my set was about about $20 but I have seen other sets that are far cheaper.  Mine is a letters and number set that came with a small mat and a setter. 


The setter is the metal rod that holds the letters and numbers for placement.  I ended up not using it because I found that I didn't have enough control over the hammer, causing the stamp to "jump" all over the washer.  I also found that taping the washer to the mat, provided more stability.  Another tip is to do this outside (it is loud...shhhhh didn't want to wake up Mikey) and I needed to do it on a hard surface with no give, like my concrete front porch or drive way. 


Once I had the kids' names stamped around the washers I colored the letters with a black Sharpie being sure to get in all the grooves and wiped off the extra with a baby wipe.


Then I wrapped the two washers together with some wire and added a key ring.  The kids' were really excited about this project and Jack insisted that I make him his own keychain with his name and he taught himself to write his name by looking at it.  Of course I had to make one for Natalie and Liam too.  Secrets are hard to keep and Jack tried really hard by telling Sam, "Mom made you a great birthday present.  It is NOT a keychain!"  

XOXO
Emily


Friday, July 13, 2012

Bitty Baby Swimsuit

Dear Monica,

Just in the last week, since giving up her Chi-Chi (aka pacifier), Natalie has taken a real interest in her Bitty Baby that Santa brought her.  She took it to church with her on Sunday carrying it in her arms like a new baby, and telling us all to be quiet because her baby was sleeping.  She has been taking it to bed every night and nap time, and asking me to change her clothes.  The American Girl catalogue came in the mail this week and she pointed out to me all the things that she wants to get for her baby.

So, this morning we were talking about our plans for the day and I mentioned that we were going to go meet Daddy at the beach this afternoon for a party.  So instead of getting dressed we were going to just go ahead and put on our bathing suits.  Natalie got her suit on and then said, "My baby doesn't have a swimming suit.  She needs a swimming suit."

So I quickly drafted a pattern for a tank suit, by tracing Bitty Baby's body.  I cut it out, sewed it all together and put it on Bitty Baby.  It looked ridiculous since Bitty Baby has soft joint on her arms and legs!  (The suit available for Bitty Baby on American Girl is a tank suit so I thought it would look fine.  WRONG!)  Natalie was thrilled with it, but I was not.

So, while we were at the beach, the wheels were turning and thinking about ways to make a suit for Bitty Baby that wouldn't show the soft joints.  And when we got home, I made this for her Bitty Baby.


A swim skirt and rash guard.  Much better. 


I have plans to put a cute, little, orange crab on the front but our internet was out for a few hours this evening, so I couldn't download one from Silhouette.  I will just have to do that tomorrow.  I need to get some more bathing suit material and make another one and a matching suit for Natalie.  

XOXO
Emily


Thursday, July 12, 2012

Rhubarb and chocolate

Dear Emily,

Your ice cream sounds fabulous! I have a little icecream maker but have hardly any room in the freezer to freeze the container right now. Your recipe makes me want to make room right now!

Rhubarb and chocolate, and mint, have been on the menu at our house this week. We have had company so not much has been happening here aside from visiting and eating. It has been a fun week and I have done more baking in the last few days than I have in the last few months. Our youngest guest, who is eight, asked of I bake like this every day. The answer was no way! One of the bonuses of having guests is that you can bake and then it is gone all at once and you don't have all the dessert hanging around the house tempting you.

I have a rhubarb plant that I planting last summer from one our mom divided. I harvested it for the first time yesterday, after asking Mom how to do it. This is what she replied to my email asking how:

Pull off the biggest stalks, or the reddest ones. Usually they are the newest ones, the ones in the center. Any are good, though.You pull on each stalk and it comes loose at the base. Don't cut them off, pull them. Then cut the leaf off at the base, where it was connected to the plant. About 2" is all you have to cut off. You don't want to harvest more than a third at a time. It takes about 10-15 for a pie.

I'm glad I asked. I would have cut the stalks off instead of pulling. I made a rhubarb custard pie using a recipe from one of our family's favorite cookbooks:

It was such a simple recipe, eggs, sugar, flour, nutmeg, and rhubarb. And so delicious - sweet and sour with no need for strawberries to cut the tartness.


For those who don't like rhubarb (mainly Paul) I made cookie bars with these. They are Nestlé Tollhouse Dark Chocolate and Mint chips and I could not find an image on their website. Maybe they dont make them anymore? I first found them at Christmas and after that they were hard to find. When I did, I bought several packages. The cookie recipe on the package is fantastic and tastes like those creme de menthe brownies without all the work. And taste way better than Girl Scout Thin Mints. Because I had limited time and because cookies are not my favorite thing to bake because of all the scooping and in and out of the oven I made them into bars instead. They were so good!

Now I am going to clean the house. We are having different company for dinner tonight. And I still have to finish rearranging the kids clothes. And get Anthony packed because we send him to the beach for a week tomorrow. Sniff sniff. It will be the first time he has been away for more than a night or two.

XOXO

Monica


Wednesday, July 11, 2012

Homemade Strawberry Ice Cream Recipe

Dear Monica,

I am not a huge fan of ice cream and I only really like to eat it when the mood hits me.  But homemade ice cream is another story.  I love the soft texture and the creaminess, which far surpasses that of any store bought ice cream.  I have many fond memories of the ice cream that Mom made when we were growing up, especially the peppermint ice cream she made still makes every Christmas.  It is a tradition that so many of those in our family (and neighbors) look forward to every year.

So, I decided that I was going to invest some of my birthday money into an ice cream maker.  I bought a Cuisinart Pure Indulgence 2 qt Ice Cream and Yogurt Maker.


This machine is fantastic!  You freeze the bowl for 6-22 hours and then put it in the machine, place the paddle in the bowl, turn it on and add your ice cream mixture.  And in about 25 minutes you have delicious homemade frozen goodness.  Much faster, easier, and less mess than those machines that require rock salt and LOTS of ice. 

So, today the (big) boys and I decided to try it out while Natalie and Mikey were napping.  We had been to the commissary this morning and bought some very pretty, juicy strawberries so we decided to make Strawberry Ice Cream.


The Ice Cream Maker came with a small recipe booklet which had a recipe for Strawberry Ice Cream.  But I didn't follow it!  The directions wanted you to use 1/2 cup sugar on 3 cups of sliced strawberries.  But strawberries are sweet enough on their own so why add the extra sugar?!?  So we didn't!  Instead, Liam used the hand blender to macerate the strawberries.  (He thought this part was great fun.)  We didn't completely macerate them, we did leave a few "chunks" of strawberry.


Then we mixed sugar and milk until the sugar was dissolved.  Then stirred in heavy cream, the macerated strawberries, and vanilla extract.


We put the bowl in the machine, placed the paddle in, the lid on and turned the machine on.  Then, we poured the strawberry mixture through the lid.  The boys spent almost the entire 25 minutes watching the mixture freeze. 


(sorry for the blurry picture...Jack was rotating his head along with the mixer)

And in about 25 minutes, we had this lovely pink goodness.


DELICIOUS!!!

Homemade Strawberry Ice Cream (modified from the Cuisinart website)

3 cups fresh ripe strawberries, macerated
1 cup sugar
1 cup whole milk (I used 2%)
2 3/4 cups heavy cream
1 1/2 teaspoons pure vanilla extract

Combine the sugar and milk and mix until the sugar is dissolved, about 3 minutes.  Stir in the heavy cream, strawberries, and vanilla.  Turn the machine on and pour the mixture into the the freezer bowl and mix until thickened, about 25 minutes.  The ice cream will be soft and creamy.  If you would like it to be firmer, put the ice cream in an air tight container in the freezer for 2 hours.  

Makes 7 cups of ice cream

Side note:
This is really just a basic recipe for vanilla ice cream (very similar to the ice cream mixes you can buy at the grocery store).  Just substitute your favorite fruit from the strawberries.  Peach is also delicious.  And of course peppermint candies.  

XOXO
Emily


Monday, July 9, 2012

Peach Cobbler

Dear Emily,

This heat wave makes me not want to do a thing! I did manage to reorganize some tubs of fabric in the garage and Paul cleaned the entire garage out. It was unbelievably messy. Most of what is left in the middle of the garage are some furniture pieces waiting to be painted. And your chairs. If it were not for the furniture, Paul could get a car in there. (That's not saying much - it is a two car garage.)

I baked a peach cobbler today and the house smells so good! I slightly modified a recipe from an old cookbook. Here is what I did:

I peeled and thinly sliced 5 cups of peaches. (Maybe 6 or 7 peaches, I could go count the pits but they are already in the compost bucket and that is kinda gross.) I combined 1 cup of sugar and 11/2 tablespoons of cornstarch in a saucepan and slowly stirred in 1 1/2 cups of water. While stirring, I brought it to a boil and allowed it to boil one minute while stirring. I turned off the heat and added the sliced peaches.
At this point, they looked so good I could have eaten it like this.
This was poured into a baking dish and dotted with butter. I used what was left of the stick from the dough - 3 tablespoons. Maybe too much but when a recipe says "dot with butter" how much butter does that really mean. Do you like my neat little squares? Looks like marshmallows. I meant to put cinnamon on after the butter but forgot so I added it after the dough.


In a bowl, I combined
1 1/2 cups of flour
1 1/2 tablespoons of sugar
2 teaspoons of baking powder
3/4 teaspoon of salt

I cut in 5 tablesppons of butter until the mixture resembled corn meal.Next, I stirred in 3/4 cup of milk. The batter was dropped by spoonfuls onto the hot peaches. And baked for 25 + minutes in a 400 degree oven.
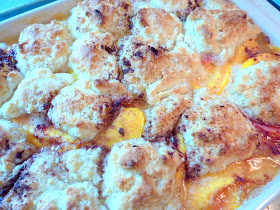
The dark brown is the cinnamon that should have been sprinkled on before the dough. Doesn't make as pretty of a presentation but it still tasted great! 
With a scoop of ice cream.

And the empty dish. We have company so there was none left for breakfast!

xoxo
Monica