Sewing our Sanity

Monday, January 13, 2014

The Wardrobe Architect

Dear Monica,

I love clothes and I love making clothes.  But lately I feel like that is just it.  I have clothes.  But what I really want is a wardrobe.  I find myself buying pieces because I like them but with no real idea of what I am going to wear them with or how they will fit with my other clothes.  Then I often find I might wear them only once or twice because I just don't have the right thing to go with it.  (Jeans really don't go with everything.)

And I have way too much.  Things I don't wear but I have them because I might wear them one day or they just don't fit.  And I also feel like I fall into the "lazy mom" category because "I am just going to be home all day with the kids, why bother?"

So my mission this year, in an effort to have a wardrobe that I love and to pair down on all the excess stuff we have before we move, I am going to join in with Sarai from Coletterie and participate in The Wardrobe Architect .  Each week Sarai will post a topic about wardrobe planning that will include discussion or an exercise.  


Want to join me?  

XOXO,

Emily


Sunday, November 17, 2013

Handkerchief Dress

Dear Monica,

A few years ago I bought a book of sewing patterns called Sewn With Love by Fiona Bell.  It is a lovely book with vintage inspired patterns and I made the boys short sleeved button up shirts.  The fit was odd, but I chalked that up to their super long torsos.  I had the itch to sew something and I had some gorgeous baby wale corduroy from Hobby Lobby, so I pulled the book off the shelf and dusted it off and decided to make Natalie the Handkerchief dress from the book.


Absolutely darling dress (and pretty cute little model too).  The details of the square neck, the trim on the bodice and waist band, and the large square sleeves where all things that caught my eye.  


But it was the WORST pattern I have ever sewn!  The directions were awful.  I consider myself to be a pretty advanced seamstress and I had a lot of difficulty figuring out the directions.  There were missing steps, poorly explained directions, and some I would have done differently.  I felt like the patterns had never been tested or edited.    


And there was no lining.  So I had to draft my own because I knew that there was no way I would ever get her to wear the dress with all the exposed seams on the bodice.  


And the sash is too short to tie in a bow.  Something told me I should have made it longer, but Mom told me that some vintage patterns and dresses had shorter sashes meant to be tied in knots.  

I do love the vintage buttons I used on the dress.  I picked them up at The Scrap Exchange in Durham. But the button placement was completely off and I had to change that around or end up with a button right on the seam of the waist band and bodice instead of centered in the middle of the waist band.  


I really do LOVE how it turned out but I don't think I will make one again (though I did make notes in the book just in case). I did go back on Amazon to look at the reviews because I thought maybe I was going crazy with all the problems I was having.  But, no, it seems everyone had problems with the patterns.   I think if the patterns were tested and edited that the book would be wonderful.

XOXO

Emily


Monday, August 5, 2013

A maxi skirt--teaching a teenager to sew

Dear Monica,

A few weeks ago, our cousin Anne-Marie stayed with us for the week. We LOVE having her stay.  The kids have a great time with her and so do I.  She is so much fun and really the best teenager I know.  It is hard to believe that she is 16!

In the past when she has stayed with me we have sewn some purses and snack bags, and a few very simple skirts.  This time, just a day before we had to take her back to her mom, she mentioned that she really liked tiered maxi skirts but that every time she tried one on in the store she was disappointed by how frumpy they looked.  So, we hoped on line and found this pattern.  It was exactly what she was looking for and it was an easy pattern.  So I bought it for her and printed it out.  We looked at the directions and I worked out the measurements for cutting each of the tiers using the tables provided in the pattern.  I didn't think that I had enough fabric in my stash so she was going to take the pattern home and break in her sewing machine, but I decided to raid my stash one last time and see if there was anything I had forgotten about.  I found a lovely vintage sheet that she really liked.  So for about $2 Anne-Marie made herself a tiered maxi skirt in one afternoon.


She did all the sewing herself, except for serging the seams, which I did for her.  The serger can be a little intimidating.  The only thing I did was help explain some of the steps.  This was also her first time shirring and she did a great job on the back of the waistband.  Here she is shirring away.  


And pinning the tiers.


And sewing the tiers together.  The only thing we changed was to add some top stitching on the tiers to hold the seams flat so she won't have to iron the seams every time she washes it and it also gave it a more polished finish.


The thing that we both liked the most was the waistband.  All of the skirts she tried on in the store had elastic waistbands all the way around.  This one only had elastic in the back and a flat front which gives you a much prettier, more flattering fit.  There were several lines of shirring and then a 1/2" piece of elastic threaded through a casing at the top.  


And the flat front.


I really loved how this waist band was put together so that the side seams are hidden.  I am going to use it on a skirt I made last summer that I don't care for the fit of.

Earlier in the week she found a headband of Natalie's and asked if I had made it.  I hadn't but I told her I knew how to and that we could make some.  It was a simple headband with dyed baby elastic and a little flower.  I already had the baby elastic that I had dyed brown and tan.  So we made a trip to Michael's and bought several flowers.  We liked the ones we found in the scrapbooking aisles the best.  When we got home she sat down at the table with the glue gun, some felt, her flowers, and the elastic and made 7 headbands for herself in less than an hour.  

This is one of those headbands and it matched the skirt perfectly.


I hope she makes another maxi skirt.  I really want to make one for myself.  


XOXO,

Emily


Tuesday, July 2, 2013

The Lonely Doll Dress

Dear Monica,

Katy at No Big Dill hosts a great series called Once Upon a Thread and guests post their creations based on a favorite children's book.  I wanted to play along last year and picked out a book and bought the fabric....and life happened.

 So, this year when she announced OUT Chapter 4, I was ready!

One of my very favorite books growing up was The Lonely Doll by Dare Wright.


I loved the black and white photos of a doll in a real world, doing real things.  It was very intriguing to me as a child.  And of course, Edith could be very naughty and got into all kinds of mischief. 

So, I decided to make a dress for my own naughty girl, Natalie.  Who we sometimes call "Naughtalie".  


I used a pattern I picked up at the thrift store for $0.75.  At first glance, the dresses look really busy and very out of date.  But the bones of the dress are classic.


In keeping with the book cover and the dress Edith wore, I chose a pink and white gingham. And I scoured the internet looking for on that was 100% cotton.  I found it at Fabric.com and ordered it in blue too, just to have on hand.  (I do that a lot but you can never have too much fabric right?!?)


Originally I thought I would make little flutter sleeves, but Natalie wanted "NO sleeves!!" So I just made the basic dress.  I was going to add some extra length but forgot when I was cutting it out and didn't have enough fabric.  With the cotton eyelet lace I added to the hem, to mimic a petticoat it turned out just the right length.  


The pattern called for a sash, but since I was going to add an apron to the dress, this would be just too many ties going on in the back.  And the finished dress was HUGE!  I wanted her to be able to wear it with or without the apron, so I took in about an inch on each side seam. 

PERFECT!


I love vintage style clothing for little girls.  It is really timeless.


I needed to sneak in a black and white photo! ;) 

or two.

XOXO

Emily


Wednesday, June 26, 2013

Photo mounted on wood

Dear Monica,

I have been meaning to get this post up for a while.  Well since Father's Day. But we had a massive thunder storm that knocked our internet out for a few days.  So here it is, Sam's Father's Day present.


I couldn't be more thrilled with the way it turned out.  I had been wanting a large canvas of the kids for a while but the price tag on a wrapped canvas was more than I wanted to pay.  This project cost me about $12.

I started out using one of those museum trays we got from the Scrap Exchange last summer (thank you Margaret for picking those up for me). 

This is the back...


and this is the front.


It is very light weight, probably about the same as a canvas.  The back side measured 20"x 30" which is exactly poster size.  I ordered a 20"x30" of my favorite photo of the kids, taken at the beach last summer, from Costco.  I thought the picture would be a bit grainy but I was thrilled with the quality.  It is very crisp and the colors are so vivid, and it was only $8.

I painted the sides and part of the back with Annie Sloan's chalk paint, mostly because it is what I had on hand.


Then, I spread Modge Podge all over the top.


And carefully mounted the photo onto the top and smoothed out all the bubbles with a rag.


After it was dry I used some sand paper to distress the corners or the photo and the "frame".


Then, I sealed the photo with more Modge Podge, slightly watered down (since I was running out).


It looks fantastic hanging on the Family Room wall and the colors in the photo are perfect with the hutch and the rocking chair.  


Perfect Father's Day gift!


XOXO,

Emily


Thursday, June 13, 2013

Birthday Part Dress refashioned to Tunic

Dear Monica,

Yesterday I posted about the Oliver + S Birthday Party Dress.  I really love this dress and kept thinking that it would make a really cute and comfortable tunic.  Since that is not an option for the pattern I decided to make my own changes to the pattern. And because so many of Natalie's clothes are sleeveless I thought I would add some cap sleeves for something a bit different.


I really loved how it turned out so I made her a second one!

(Super windy day at the Arts Festival)

To start modifying this pattern, I decided that I wanted the finished tunic length to be 16", so I adjusted the front and back side pattern pieces to be 17" long for seam allowance.


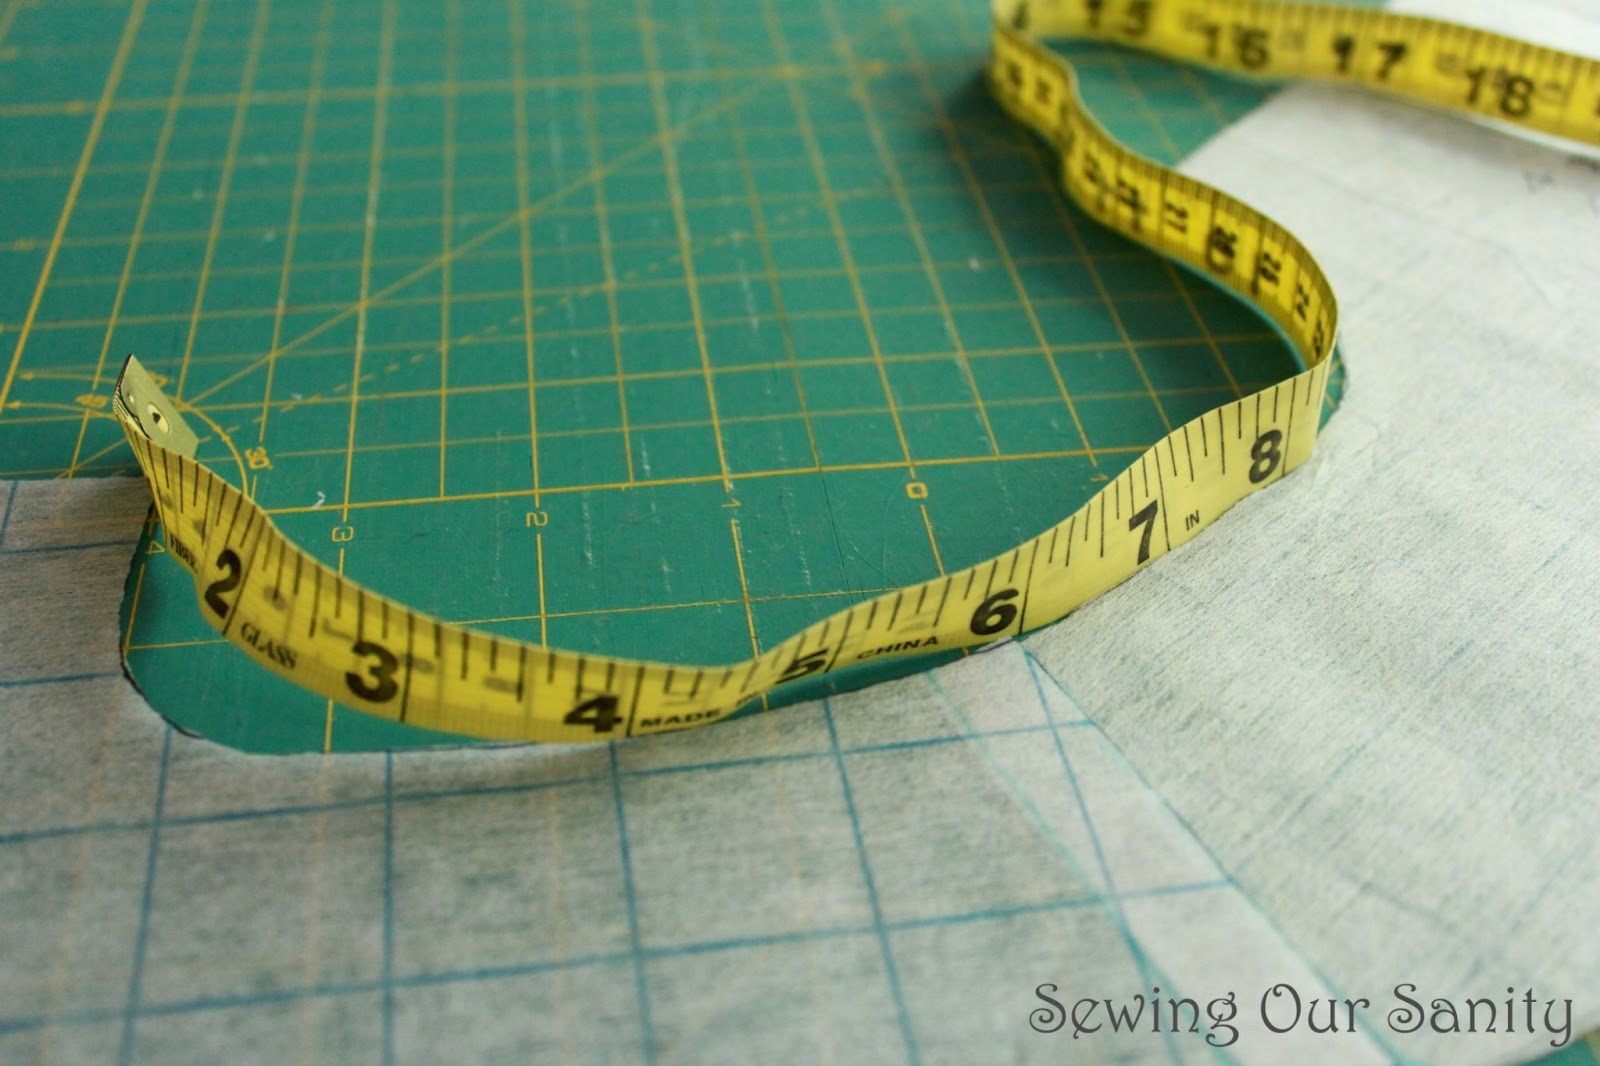
Because the finished dress had a slightly curved edge, I placed the bottom facing piece on my new tunic line and traced it to get the slight curve.  I also figured the new facing pattern piece. As you can see in the picture the tunic cutting line for the facing piece is 1/2" longer.


To figure the length for the front center and back center panels, I matched up the dots on the pattern pieces (see the arrows) and matched the new tunic lines from the side pieces.


To get the front lining piece, I placed the pieces across the front side panel pattern piece and the center panel pieces and drew the new tunic line 1/2" longer than the other two pieces. (Sorry the picture is so grainy.)


Next I made the cap sleeve.  To do this, I overlaid the front and back side pieces by 1/2" for the seam allowance and measured the arm.  The arm for the size 4 is 11".


So I cut a piece that was 10.5" long by 3" wide and rounded out one side.


To assemble the tunic I followed the pattern and assembled the front and back pieces.  BUT I sewed the pieces together at the shoulders (not the sides as the pattern calls for).

Then I attached the cap sleeve and pressed the seam towards the tunic.


Next, I sewed the shoulder seams of the facing pieces together.  Then I attached the facing to the tunic following steps 1-3 in the pattern, which will attach the facing around the neck line of the tunic.

Then, I pinned the facing to the armhole being sure to sandwich the sleeve to the inside.


After sewing the facing to the armhole, I pulled the back piece through the tube created by sewing the armhole facing, to turn the tunic right side out.


Finally, I sewed the side seams of the lining and the dress in one long line.  


Then I finished the rest of the tunic just as you would finish the dress.


I paired it with the Oliver + S Puppet Show shorts.


XOXO,

Emily


Wednesday, June 12, 2013

Birthday Party Dress

Dear Monica,

I made Natalie the Oliver + S Birthday Party Dress. Have I told you how much I love Oliver + S patterns?  They are fabulous!


 I made it a few months ago with Mermaids from Storyboek Two by Birch Fabrics and have been waiting for it to get warm enough for her to wear.  Well, it is finally warm enough and it is such a cute dress.


As with all Oliver + S patterns, the details on this dress are lovely.  There are two options for the front panel, a tab or a tie.  I chose the tab and used a red Kona cotton.  I love turquoise and red.


I made her a headband to match.  I made up a little pattern for this and made it reversible but then decided to add a yo-yo to add a little more detail.  She doesn't like things in her hair but she said this was "comfy".  I will do a post on this soon.


We had a fun little photo shoot at our community dock this evening.  And I got so many cute shots.  


XOXO

Emily

Just one more.  This is my favorite.