Sewing our Sanity

Friday, June 29, 2012

Babyville diapers

Dear Monica,

I am slowly whittling down my list of projects and I finally got around to a project that I have been wanting to do for weeks now. I used Babyville's line of polyurethane laminate or PUL to make some diapers for Mikey.


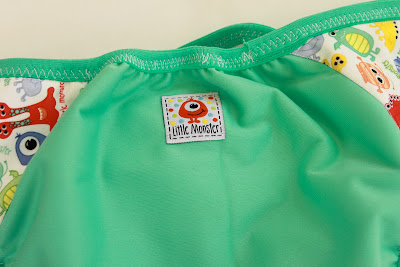
You can purchase the fabrics by the yard or in precut assorted packages.  I used this Dinos and Monsters package to make my diapers.  I really love the monster fabric, it is my favorite.  Babyville also has FOE (fold over elastic), coordinating snaps, labels, and appliques to customize your diapers.  They also have a fabulous book with directions and patterns for making ten different types of cloth diapers. The directions are easy to follow with step-by-step color pictures and lots of tips on how to customize each type of diaper to get the best fit for your baby.  They also have a blog with even more helpful tips. I found directions on their blog on how to get 2 diapers out of each 21" x 24" PUL cut!  


I made 4 different types of diapers for Mikey. The first one I made was a basic pocket diaper with FOE and micro suede (the fabric that wicks moisture away from the baby's body).  I choose snaps for all the diapers I made because my experience with velcro is that it just doesn't hold up.


This diaper fit him very well but I felt like it need a little more protection in the leg area.  No problem!  I just used the directions to add gussets 


and a super cute label!


I also made a pocket diaper, that was turned and top stitched and had leg elastic. A perfect fit for his chunky thighs.


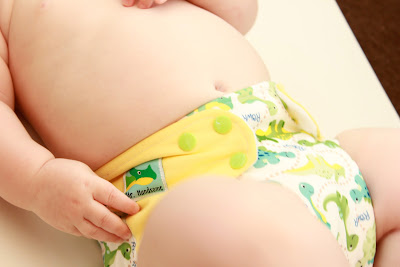
And I made an AIO (all in one) diaper with a sewn in soaker and an adorable Dino label on the wing.


These diapers make a great addition to our cloth diaper stash and the prints are so cute.  I will be making more of these, maybe with this monkey and owl package.

And I have to say this little chunk looks awfully cute in all those new diapers!


He can't decide if his thumb is for chewing or sucking but either way he is just too cute!  


XOXO

Emily


Thursday, June 28, 2012

Quilts

Dear Monica,

I can't wait to see the kids' rooms when you are finished!  Especially the purple wall in the boys' room.

I have a few ideas for some quilts that would be quick and fun to make.

These quilts that I made for my boys' did not take very long to piece and I love how they turned out.  This pattern would be great if you have a specific fabric line you want to showcase and don't quite know how to pull it all together. (I have the pattern some where I just can't put my hands on it at the moment.)

When Jack was born, Mom gave me some adorable Pirate fabric by Timeless Treasures.  She gave me a yard each of 9 different fabrics.  They were all so cute but I just didn't know how to put them all together until I found the pattern I used.  It show cases each of the prints and I love the pieced border.

I started on Liam's when Jack was 8 weeks old.  He was such a good baby and sat in his bouncy seat while I cut and pieced the quilt top.


After I sandwiched the quilt I quilted the whole thing on my Bernina 1630.  It took FOREVER!  I painstakingly designed my own free motion designs to quilt in each square and I really love how they turned out.


Apparently it took me about 10 months to complete the whole thing because this is the first picture I took of it completed and on his bed. Look how little my big boys were!  


This is Jack's quilt.  I reversed the border on his, so the red would be wider.  That way the quilts wouldn't be exactly the same.  I also quilted his on Mom's longarm in a meandering path which made it super fast to finish. 


Another great choice would be a stack and whack quilt like this one I made for our bedroom 7 years ago.  


 I had such a good time making this one.  All you do is stack up your fabric, place the template on top, and cut the fabric.  It took me about 30 minutes to cut all the pieces for this quilt. Then you rearrange the pieces in each stack and then piece each square.  I have 5 different stack and whack patterns and one of them is a star. You could do purple and grey batiks.

xoxo

Emily


Wednesday, June 27, 2012

Behr Paint Love

Dear Emily,

Not much sewing has been going on around here. Though I did manage to clean the stuff of my sewing desk that has been accumulating on and beside my machine. I wonder sometimes if we should have called this blog "What I Was Doing Instead of Sewing," or something like that. I am in the middle of painting and switching the kids' rooms. We have done this twice in the five+ years we have lived here and I swear we are never going to switch again! Anthony and Caroline have been sharing the smaller blue and red room while Gabe has been in the green room which has doubled as a nursery and guest room. Caroline will now be in the smaller room and it is going to be pink and girly but not to frou-frouie, something that will grow with her. [She wants to paint it herself. I told her that my mom let me paint my room my whatever color I wanted when I was 16. I told her she could do the same when she is 16.] When Anthony was told we were switching rooms and they were going to be repainted, he quickly declared he wanted purple. Yep. Purple. Dark purple. For his dad's high school alma mater, where he now teaches. And eagles, the mascot. No way was I going to paint the entire room purple. The back wall is purple, Darkest Grape. The other three walls are Ashes and the trim is Cotton Knit. All three are paint and primer all in one by Behr. I love their paint. It covers so well. I did have to do two coats of the purple but one coat of the gray was all it needed. Here are a couple of before shots.


 Ignore the messy bookshelf.
All of the furniture in this room will go into the soon to be pink room. Except the crib. 


You will have to wait for a couple of days to see the semi-finished results.  I will still need to hunt down some eagles and the beds will need new spreads/quilts and the window needs curtains. Blackout curtains. Those boys get up too early! My to-do list keeps growing! And so does the pile of laundry. At least it is all mostly clean, just need to fold it!

xoxo,
Monica

PS. Do you have any good ideas for quick quilts for the boys? Purples and grays. Maybe a touch of green, white, or yellow.What do you think? 

Tuesday, June 26, 2012

Bird Nest Necklace

Dear Emily,

I'll have to try that men's shirt and tie refashion. I have a pink tie I bought at Goodwill some time ago to make a tie snake with but have not gotten around to it. It would make a great tie for this top!

When Gabe and I went out to get the mail after his nap this afternoon, I was just expecting the usual boring Monday mail. The usual junk was in the mailbox but there was also a package on the porch below. Thank you! What a great surprise! Gabe was tickled with the Potty Elmo doll. Somehow he knew exactly what it did but refused to try on his own potty. Ugh!
http://www.amazon.com

I am so glad you found Caroline's hat and she was happy to see it in the package with Elmo! I was sure it was lost last summer. I will have to send you an updated picture of her in it. I'll take a new picture of her in it but here is an old one I found from two years ago. 


You need to send me the pattern. I know a couple of new babies who could use a hat like these. They are so unique!


While looking for a picture of her in the hat, I found this:


And this:


{Sorry, I got sidetracked on Memory Lane...}

I love what you sent me in the package with Potty Elmo, in this little blue box...


 Perfect "Mom" jewelry! I love, love, love it! Thanks! XOXOXO

Love,
Monica

Monday, June 25, 2012

Men's shirt and tie refashion

Dear Monica,

Often I see things on Pinterest that I would love to make and never get around to it. But the other day, I saw a really cute shirt and thought, "Hey that wouldn't take too long and I already have everything I need."  So, in about 15 minutes, I whipped out a super cute shirt for myself using an old dress shirt of Sam's and a tie.


I cut the sleeves off the shirt and then cut straight across the top of the shirt just below the second button. 


Then I serged the armholes and the top. 


Then I had to go outside and see what the kids found in our playhouse.


It was a green rough snake, which is totally harmless.  I have to say that I HATE snakes and they really give me the creeps, but for some reason this one wasn't so bad. The kids were thrilled to see it and Natalie kept saying, "Him cute Mom!"  I wouldn't go that far but he was pretty neat.   

Then, back inside and back to work on my shirt.  I turned the armholes under 1/4 in and stitched them in place and then turned the top down 1 1/2" and stitched to make a casing.  If you don't have a serger, turn the armhole edge under 1/4 " and then another 1/4" and turn the top casing under 1/4" and then 1 1/4".


Then I treaded the tie through the back casing and around through the front in a loop and tied the two ends together.  A perfect summer top.


Thursday, June 21, 2012

Homemade Pizza Sauce

Dear Emily,

When I asked Anthony what he wanted for his birthday dinner, he said homemade pizza. I've benn making homemade pizza dough for years in my Cuisinart food processor. It is probably what I use it for the most. Here is the recipe:
 

 Ingredients

            1 package active dry yeast 
            1 teaspoon granulated sugar 
            2/3 cup warm water (105 to 115°F.)
            1 2/3 cups unbleached, all-purpose flour
             ¾ teaspoons table salt
              ¾ teaspoon extra virgin olive oil

Instructions

In a 2-cup liquid measure, dissolve yeast and sugar in warm water. Let stand until foamy, about 3 to 5 minutes. Insert metal blade in work bowl and add flour and salt. 
With machine running, pour liquid through small feed tube as fast as flour absorbs it. Process until dough cleans sides of work bowl and forms a ball. Then process for 30 seconds to knead dough. Dough may be slightly sticky. Coat dough evenly with olive oil; transfer to a plastic food storage bag and seal the top. Let rise in a warm place for about 45 minutes. 
Place dough on a lightly floured surface and punch down. Roll into desired crust sizes and place on baking pans lightly sprayed with vegetable oil cooking spray. Follow with a pizza recipe.
                                                                                                          From cuisinart.com
To top it, I always use a jarred pizza sauce, along with mozzerela and pepperoni. I had no pizza sauce this time so I decided to make my own. And make extra to freeze.
My recipe:
2 28 oz cans of crushed tomatoes
1 12 oz can of tomato past
1 cup water
1 tbsp sugar
two cloves of garlic, minced (or more)
1 bay leaf
basil, oregeno, thyme (I have fresh basil and oregeno so I used 1/4 cup of each. A total guess. When I use fresh herbs, I will use more or less what the recipe calls for. Less if I am tired of cutting it. Chopping fresh herbs is not my favorite thing. 


I really wish I had one of these:
[Mom - bring me one the next time you go to Alaska]
Anyway, I digress...
I just simmered everything for an hour or so. I used 2 cups on the pizza and packaged the rest in freezer bags for later. 
 Yummy pizza and super easy birthday dinner!


Happy 7th Birthday Anthony! (the fishing theme cake he requested because he was asking for a fishing pole for his birthday. Much easier than the bulldozer cake I made when he was three!)
xoxo
Monica


Wednesday, June 20, 2012

Mason Jar Sippy Cups

Dear Monica,

Have you seen these lids? What a great idea for Mason Jars!  And they would be darling for a party.


 I first saw them on The Plaid Barn but missed out on the daily deal.  So I decided to come up with something else on my own.  After doing a little research and looking at Pinterest for inspiration I decided on a plan.

I bought a plastic placemat from Walmart and traced the flat lid from my jars.


Then I cut the circle out just inside the line and punched a hole in the circle.  


And now I have some very cute Mason Jar Sippy Cups perfect for a party.


xoxo

Emily


Tuesday, June 19, 2012

Fun with Ivory Soap

Dear Monica,

We are finally all on the mend and I feel ready to get back to sewing and crafting.  But since I spent a day or so in bed with an awful virus and neglected the wee ones (Sam was a HUGE help, couldn't have been sick without him) I decided that I would play with my kids first.  So we had some fun with Ivory soap.

Did you know that you can put a bar of Ivory soap in the microwave and it becomes this?


Pretty cool, huh? I would really like to know who figured this out.

Ivory soap is super cheap (about $0.25 a bar) and a fresh bar works best, I am told. I put a piece of parchment paper on the bottom of the microwave and placed the bar on top. 


I turned the turn table off and we watched the bar turn into a soap cloud.  Then the kids pulled it apart and crushed it up into soap flakes. 


Then I added a tiny bit of warm water and some food coloring and stirred it all up.  (On Our Best Bites she put hers in a food processor and made it really smooth and I will probably do this next time.) Then the kids pressed the soap into cookie cutters to make little soaps for the bath tub. 


A very fun activity.  I think next time we make a soap cloud we will play with it in the baby pool outside.  Then I can just "hose them off" as Dad would say!

xoxo

Emily


Friday, June 15, 2012

Longarm quilting and haircuts, too

Dear Emily,

The week at home is flying by as usual! It has taken me until Thursday to finally start the actual quilting. 


One of the harder things in quilting, I think, is making the quilt sandwich. [the layers of the quilt make up the "sandwich" - the quilt top, the batting in the middle, and then the backing fabric] The backing has to be perfectly smooth and kind of taut when pinning the layers together prior to the quilting [For those of you who are new to all this quilting stuff, "piecing" is what you call sewing the individual parts together to make the squares and sewing all the squares together to make the quilt top. "Quilting" is the sewing that holds the "sandwich" together and is visible.] If the fabric isn't smooth, there will be puckers on the back of the quilt when all quilting is finished. Not pretty. If a quilt is small enough, I can tape the backing to the kitchen table to keep it taut while pinning it together. If the quilt is bigger than my table, I have to mop my kitchen floor super well and tape the backing there. Putting all the parts together on a longarm quilting is a bit easier, though you have to be careful to roll it up straight and free of wrinkles. The backing fabric is on one roller, the quilt top on another, and the batting on another and they all roll together as the quilting progresses. 


I discovered a fabulous way to mark the quilt, too. I'll send you pictures of that later.

And what are the kids doing while all this is going on? Playing in this:
Don't you wish we had this when we were kids?

Besides getting the quilting starting this week, the second major accomplishment was cutting this boy's hair. 
Before


After. Who is this kid?


(Thanks to the fabulous Mary at Glow.)

And not to be left out, Caroline got her second hair cut ever.
Before. She was sitting on her hair and it was everywhere.

Second time in a beauty parlor chair. Ever.

Still mermaid hair for the pool but slightly more manageable.


She looks a little less than thrilled. She'll get used to it. Thanks Mary!

I hope your house has recovered from the yucky summer crud!

xoxo
Monica